
Ever wondered how to turn those everyday cotton swabs into something spooktacular? Well, get ready to unleash your inner artist because we’re diving into the wonderful world of skeleton craft with Q tips for fun DIY projects! Forget expensive art supplies; we’re making bone-chillingly awesome creations with something you probably already have in your bathroom cabinet.
This article will guide you through easy and creative ways to make skeletons using Q-tips, perfect for Halloween decorations, educational activities, or just a fun afternoon project. Let’s get crafting!
Why Skeleton Craft with Q Tips is a Fantastic Idea
Why should you choose Q-tips for your skeleton crafts? The answer is simple: they’re readily available, inexpensive, and incredibly versatile!
They offer a unique texture and shape that perfectly mimic the look of bones. Plus, crafting with Q-tips is a fantastic activity for kids and adults alike, promoting creativity and fine motor skills.
Essential Materials for Your Q Tip Skeleton
Before we start building our bony buddies, let’s gather the necessary supplies. Don’t worry, you probably have most of these items already!
- Q-tips (lots of them!)
- Black construction paper
- White school glue or hot glue gun (adult supervision required for hot glue)
- Scissors
- Pencil
- Optional: Googly eyes, glitter, paint, yarn
Step-by-Step Guide to Creating a Basic Q Tip Skeleton
Ready to build your first Q-tip skeleton? Follow these simple steps, and you’ll have a bone-afide masterpiece in no time!
Preparing the Q Tips
First, you’ll need to prepare your Q-tips. For a realistic look, consider trimming some of them to different lengths.
This will help create a more varied and natural bone structure. You can also leave some Q-tips whole for longer bones like the femur (thigh bone).
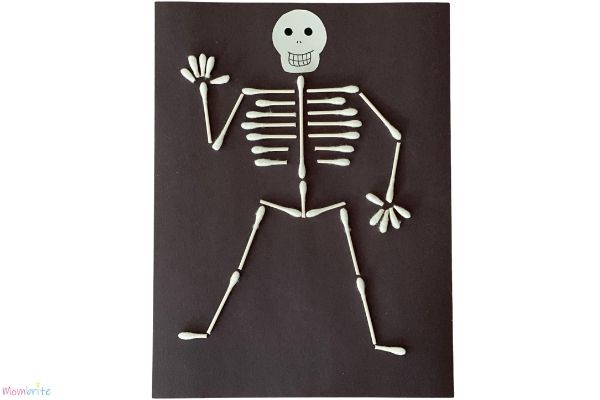
Assembling the Skeleton Frame
Now, let’s start assembling the skeleton frame. This is where the magic happens!
- Head: Create a small circle using Q-tips. Glue them together side by side to form a round shape.
- Rib Cage: Cut Q-tips in half and arrange them in a curved shape to form the rib cage. Glue them onto the black paper.
- Spine: Use whole Q-tips to create the spine. Glue them in a straight line down the center of the rib cage.
- Pelvis: Create a small, diamond-shaped structure with Q-tips for the pelvis. Glue it to the bottom of the spine.
- Arms and Legs: Use whole or trimmed Q-tips to create the arms and legs. Arrange them in a bone-like structure and glue them to the shoulders and hips.
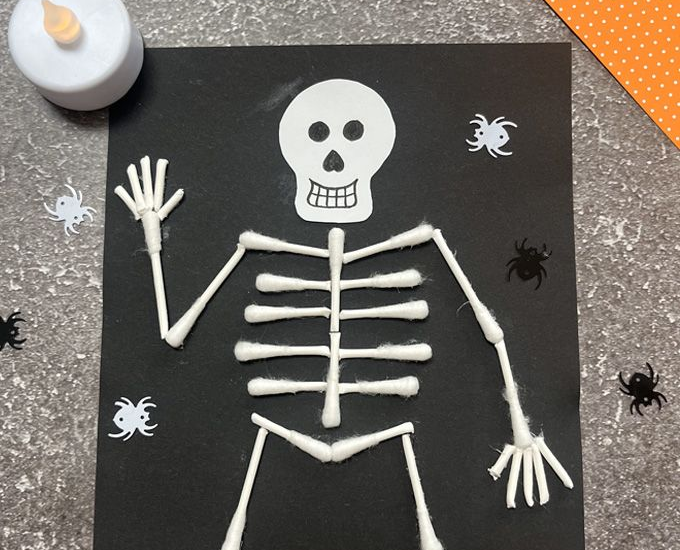
Adding Details and Finishing Touches
Once the basic skeleton frame is complete, it’s time to add details and finishing touches to bring your creation to life.
- Joints: Use small pieces of Q-tips to create joints at the shoulders, elbows, hips, and knees.
- Hands and Feet: Cut Q-tips into smaller pieces to create hands and feet. Arrange them in a finger or toe-like shape.
- Facial Features: Add googly eyes for a playful touch. You can also use a black marker to draw a simple skull face.
Advanced Skeleton Craft Ideas with Q Tips
Want to take your Q-tip skeleton craft to the next level? Here are some advanced ideas to inspire you:
3D Q Tip Skeleton Model
Create a 3D skeleton model by building the skeleton frame on a small cardboard box or foam base. This allows you to create a free-standing skeleton that can be displayed on a shelf or table.
Use hot glue for a stronger hold, but remember to supervise children closely or handle this step yourself.
Q Tip Skeleton Wreath
Make a spooky Halloween wreath by gluing Q-tip skeletons onto a foam wreath form. Decorate the wreath with other Halloween-themed embellishments, such as glitter, ribbon, and plastic spiders.
This is a great way to add a touch of spooky fun to your front door.
Q Tip Skeleton Garland
Create a festive Halloween garland by stringing together multiple Q-tip skeletons. Use yarn or string to connect the skeletons, and hang the garland across a doorway, window, or mantel.
Add colorful beads or other decorations to make the garland even more eye-catching.
Q Tip Skeleton Anatomy Lesson
Turn your skeleton craft into an educational experience! Label each bone with its correct anatomical name.
This is a fun and engaging way for kids to learn about the human skeleton. You can even create a diagram of the skeleton and label each part.
Tips and Tricks for Perfect Q Tip Skeletons
Here are some helpful tips and tricks to ensure your Q-tip skeletons turn out perfectly:
- Use a variety of Q-tip lengths: This will make your skeleton look more realistic and interesting.
- Experiment with different poses: Don’t be afraid to get creative with the skeleton’s pose. You can make it dancing, waving, or even doing yoga!
- Add color: Use paint or markers to add color to your skeleton. You can make it glow-in-the-dark for a spooky effect.
- Don’t be afraid to experiment: The most important thing is to have fun and let your creativity flow!
Q Tip Skeleton: Perfect for Halloween Decorations
Q-tip skeletons are a fantastic addition to your Halloween decorations. They’re easy to make, inexpensive, and can be customized to fit your unique style.
Hang them from the ceiling, display them on shelves, or use them as part of a spooky centerpiece.
Q Tip Skeleton: Educational Activity for Kids
Creating Q-tip skeletons is not only fun but also educational. It’s a great way to teach kids about the human skeleton and anatomy.
They’ll learn about the different bones in the body and how they fit together. Plus, it’s a hands-on activity that will keep them engaged and entertained.
Q Tip Skeleton: A Fun DIY Project for All Ages
Whether you’re a seasoned crafter or a beginner, making Q-tip skeletons is a fun and rewarding DIY project for all ages.
It’s a great way to unleash your creativity, spend quality time with family and friends, and create something unique and memorable.
Alternative Materials for Skeleton Crafts
While Q-tips are a fantastic option, you can also use other materials for your skeleton crafts.
- Cotton Swabs: Similar to Q-tips, but without the plastic stick.
- Popsicle Sticks: Great for creating larger, more sturdy skeletons.
- Pasta: Different shapes of pasta can be used to represent different bones.
- Pipe Cleaners: Flexible and easy to shape, perfect for creating poseable skeletons.
Displaying Your Q Tip Skeleton Creations
Once you’ve created your Q-tip skeletons, it’s time to show them off! Here are some creative ways to display your creations:
- Hang them from the ceiling: Use fishing line to hang your skeletons from the ceiling for a spooky effect.
- Create a spooky scene: Arrange your skeletons in a graveyard scene with tombstones and other Halloween decorations.
- Frame them: Frame your Q-tip skeletons and hang them on the wall as artwork.
- Use them as party decorations: Decorate your Halloween party with Q-tip skeletons for a fun and festive atmosphere.
Conclusion
Creating a skeleton craft with Q tips for fun DIY projects is a fantastic way to unleash your creativity, learn about anatomy, and add a spooky touch to your Halloween decorations. With readily available materials and simple techniques, you can create bone-chillingly awesome creations that will impress everyone. So grab your Q-tips, gather your supplies, and get ready to craft some skeletal masterpieces!
What are your favorite skeleton craft ideas? Share your experiences and tips in the comments below!
FAQ Section
Q1: Are Q-tip skeletons safe for young children?
A: While Q-tip skeletons are generally safe, adult supervision is recommended, especially when using glue or scissors. Ensure that small pieces are not ingested by young children.
Q2: Can I paint the Q-tips before assembling the skeleton?
A: Absolutely! Painting the Q-tips before assembly can add a unique and colorful twist to your skeleton craft. Use non-toxic paints and allow them to dry completely before gluing the pieces together.
Q3: How can I make my Q-tip skeleton glow in the dark?
A: Use glow-in-the-dark paint on the Q-tips before assembling the skeleton. Alternatively, you can purchase glow-in-the-dark Q-tips or use a glow-in-the-dark glue to attach the pieces together.